
What you need before you start
You need a soft measuring tape, a mirror if you are on your own, and about two minutes. A tailor’s tape is ideal. A rigid metal tape is not, because it will not follow the curve of the ribcage.
Measure on bare skin or over a thin, unpadded bra. Padding, push-up inserts and minimizers all change the shape of the bust, so they change the number on the tape. A t-shirt over the top adds bulk too. Stand straight, keep your arms relaxed at your sides, and breathe normally. Holding your breath or puffing out your chest gives a reading you will not have the rest of the day.
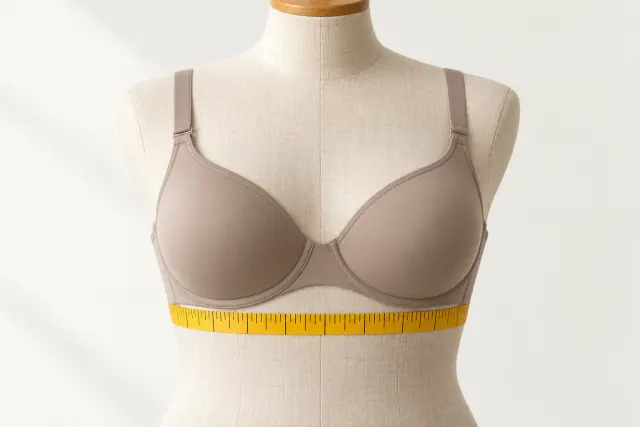
Step 1: the snug underbust
Wrap the tape around your ribcage directly under the bust, where a bra band would sit. Pull it snug. It should feel firm against the skin but not dig in or leave a mark. Check in the mirror that the tape is level all the way round. It tends to rise at the back, and a tilted tape adds inches.
Read the number and round it to the nearest whole inch. This is your band. If the result is an even number, that is your band size. If it is odd, see the section on odd numbers below.
Some fitting guides also take a loose and a tight underbust and compare the three. That is useful if your ribcage is very soft or very firm, but the snug figure is the one the calculator uses.
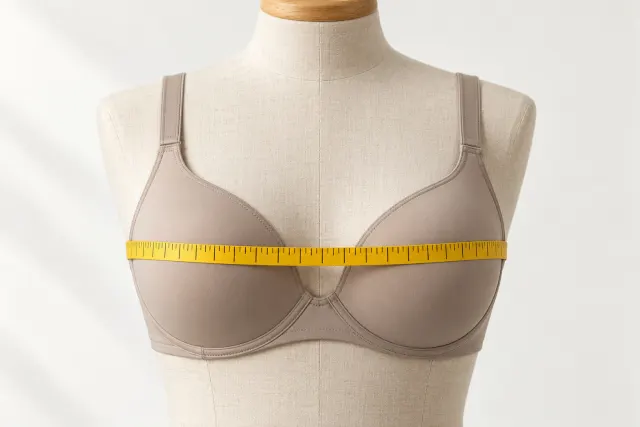
Step 2: the standing bust
Now wrap the tape around the fullest part of the bust, usually at nipple level, still standing straight. Keep the tape level across your back. This time do not pull it tight. It should rest on the skin without pressing the bust flat.
Take the reading to the nearest inch, or half inch if you like. You now have the second number.
Step 3, optional: the leaning bust
Bend forward from the hips until your upper body is roughly parallel to the floor, and measure around the fullest part of the bust again, with the tape loose. This captures breast tissue that settles differently when you stand.
If your leaning and standing numbers are close, use either. If the leaning number is clearly larger, use the leaning one. It is often the more accurate guide to the cup size you need, especially for fuller or softer busts.
The maths, in plain words
Subtract the band from the bust. Each inch of difference is one cup size:
- 0 inches is AA
- 1 inch is A
- 2 inches is B
- 3 inches is C
- 4 inches is D
- 5 inches is DD
- 6 inches is E in UK sizing, which is DDD in US sizing
The steps continue from there, and the systems use different letters at the larger end. The bra cup size page walks through the full letter order.
Two worked examples:
- Snug underbust 31.6 in rounds to 32. Standing bust 36.2 in. The difference is about 4 inches, so the size is 32D in US and UK sizing.
- Snug underbust 34 in. Leaning bust 37 in. The difference is 3 inches, so the size is 34C, which is AU 12C, EU 75C and FR 90C.
The calculator above does this for you and converts to the system you choose.
When the underbust is an odd number
Bra bands come in even numbers: 30, 32, 34 and so on. If your snug underbust rounds to 33, you sit between two bands.
The calculator takes the band below as the main suggestion, because a firmer band gives more support, and works out the cup from that band. It then shows the band above with one cup smaller as the alternative. For example, a 33 in underbust with a 37 in bust gives 32DD as the main size and 34D as the option. Those two are sister sizes: roughly the same cup volume on a different band.
Which one you keep is a fit question, not a maths one. If the 32 band feels tight enough to bother you on the loosest hook, the 34 is your size.
Common mistakes that shift the result
- Measuring over a padded bra. The bust reading goes up and the cup comes out too large.
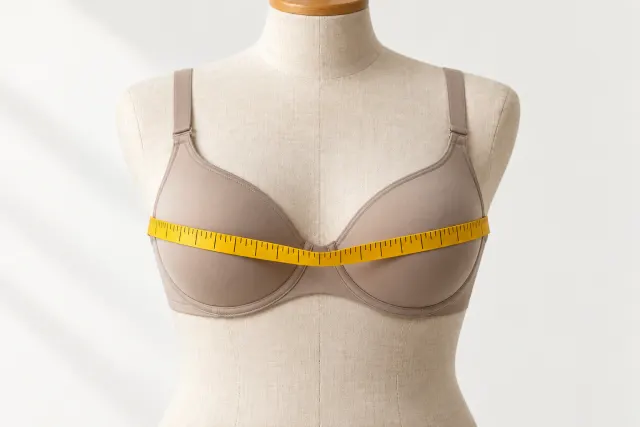
- A tape that rides up at the back. Both numbers grow, and the band ends up loose.
- Pulling the bust measurement tight. The cup comes out too small.
- Adding inches to the underbust. An older method added 4 inches. It produces bands that slide up and cups that spill.
- Trusting the number over the mirror. The tape gives a starting size. Brand, style and breast shape still decide the final fit.
Check the result in a real bra
A measurement is a strong starting point, and it is the most reliable method we offer. It is still a starting point. When you try the size on, use the how a bra should fit: the band sits level and firm on the loosest hook, the cups hold everything without gaps, the center panel lies flat, and the straps leave room for two fingers.
New bras are meant to fit on the loosest hook. The band elastic relaxes with wear, and the tighter hooks are there for later. If a new bra only feels secure on the tightest hook, the band is too big.
If something is off, the fix is usually one step in one direction. A band that rides up wants a smaller band and a larger cup. Cups that gape want a smaller cup or a different shape, often an unlined, seamed style.
Measuring someone else
If you are measuring a partner, the method is the same and it goes faster with two people, because one can hold the tape level at the back. Keep it practical and brief, and let her read the numbers. The measure together guide covers how to ask, and what to do if the answer is no.
Your size is not fixed
Bra size changes with weight, hormones, pregnancy, breastfeeding and age. Brands also differ. Fitting guides suggest measuring again every 6 to 12 months, or whenever your usual bras start to feel wrong. It takes two minutes, and the bra size chart will translate the result to any country.
In the UK, the UK bra size calculator opens in UK sizes and centimetres. In Australia and New Zealand, use the Australian bra size calculator.
No tape measure at home? Print one: the printable measuring tape comes out true to size in inches or centimeters. And if your bras stopped fitting, it may be the bra, not you: see how long bras last.
Sources & method: sizing rules follow the standard band-and-cup system used by UK, US, AU and EU brands, checked against fitting guides from specialist retailers and fitting communities. How we work.